
Making Ghungroos!
There is something I find very therapeutic about making and attaching ghungroos to a piece of jewellery. It is a very time consuming task, but it looks just oh-so-pretty once they all bunch together very nicely.You can give off a wave of satisfaction when everything is nice and ready. Personally I have sat and made about 500 ghunroos in one sitting.... for an earring, and by the end my fingers were sore but the earring glowed! Literally!

Material:
1. Ghungroo wire
2. 3mm beads
3. Round nosed pliers
Beads:
You will need some small sized beads, I recommend upto 4mm size only. Anything larger and they start making the entire piece of jewellery heavy and bulky. You can get away with it, if its a neck piece but in earrings its a make or break factor is usually weight.
Ghungroo wire:
This is small ball ended thin wire, usually made from a flexible metal like say copper.
Round Nosed Pliers:
We use this to make the loops of the finished piece even and rounded not to mention is gives a good grips when you have to make the loops.
Making Ghungroos
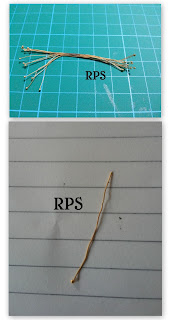 Take a ghungroo wire from the bunch, it has a ball end at both the ends so we need to cut it into half first and then use it as a ghungroo wire. Slide the bead into the wire so that it rests against the ball end of the wire.
Tug the open end of the wire to make sure that the ball end of the wire does not slip out of the bead. If for any reason the ball end slips out of the bead either take another bead with a smaller hole in it or add a seed bead at the ball end before you slide the actual bead in so that it acts at the end of the wire. Usually this method is used for bigger sized beads since their holes are correspondingly bigger. But remember if you use seed beads then use them in all so as to keep them looking the same, irrespective of the other bead holes.
Once the bead is in the wire use your round nosed pliers and place the ghungroos wire between the two prongs of the pliers. Press the pliers together so that the wire is caught in between and does not move. While it should essentially not move, do not put too much pressure on the wire because it might cause damage and eventually become weak and break. The wire should be placed in between the pliers closer to the bead ( as shown in the below picture), leaving a gap of 1-2mm between the pliers and the bead to allow for the first perpendicular loop to be placed.

Make a loop with the wire around ONE prong of the round nosed pliers. I use the forefinger of my left hand to hold the wire in place after this loop so that the wire does not budge and I can adjust the pressure of my hand simultaneously. I hold the pliers in my left hand and use my right to make the loops since I am right handed. It is most comfortable for me, please take your time to find what works for you.

Once you have looped the wire around the pliers, now change direction and start moving the wire on top of the bead around the wire ( perpendicular to the loop around the pliers). So start making loops from the wire at the top of the bead , moving downwards onto the bead. Once you wrap the wire around the bead tuck the last bit of wire inwards with the back of your nail so that it does not stick out. Doing this not only gives a finished look, it also protects the wire from snagging in hair or clothes or poking into skin.

I hope this makes your design a little more festive as I did mine!
~Sore hands
Richa
There is something I find very therapeutic about making and attaching ghungroos to a piece of jewellery. It is a very time consuming task, but it looks just oh-so-pretty once they all bunch together very nicely.You can give off a wave of satisfaction when everything is nice and ready. Personally I have sat and made about 500 ghunroos in one sitting.... for an earring, and by the end my fingers were sore but the earring glowed! Literally!

Material:
1. Ghungroo wire
2. 3mm beads
3. Round nosed pliers
Beads:
You will need some small sized beads, I recommend upto 4mm size only. Anything larger and they start making the entire piece of jewellery heavy and bulky. You can get away with it, if its a neck piece but in earrings its a make or break factor is usually weight.
Ghungroo wire:
This is small ball ended thin wire, usually made from a flexible metal like say copper.
Round Nosed Pliers:
We use this to make the loops of the finished piece even and rounded not to mention is gives a good grips when you have to make the loops.
Making Ghungroos
 Take a ghungroo wire from the bunch, it has a ball end at both the ends so we need to cut it into half first and then use it as a ghungroo wire. Slide the bead into the wire so that it rests against the ball end of the wire.
Tug the open end of the wire to make sure that the ball end of the wire does not slip out of the bead. If for any reason the ball end slips out of the bead either take another bead with a smaller hole in it or add a seed bead at the ball end before you slide the actual bead in so that it acts at the end of the wire. Usually this method is used for bigger sized beads since their holes are correspondingly bigger. But remember if you use seed beads then use them in all so as to keep them looking the same, irrespective of the other bead holes.
Once the bead is in the wire use your round nosed pliers and place the ghungroos wire between the two prongs of the pliers. Press the pliers together so that the wire is caught in between and does not move. While it should essentially not move, do not put too much pressure on the wire because it might cause damage and eventually become weak and break. The wire should be placed in between the pliers closer to the bead ( as shown in the below picture), leaving a gap of 1-2mm between the pliers and the bead to allow for the first perpendicular loop to be placed.

Make a loop with the wire around ONE prong of the round nosed pliers. I use the forefinger of my left hand to hold the wire in place after this loop so that the wire does not budge and I can adjust the pressure of my hand simultaneously. I hold the pliers in my left hand and use my right to make the loops since I am right handed. It is most comfortable for me, please take your time to find what works for you.

Once you have looped the wire around the pliers, now change direction and start moving the wire on top of the bead around the wire ( perpendicular to the loop around the pliers). So start making loops from the wire at the top of the bead , moving downwards onto the bead. Once you wrap the wire around the bead tuck the last bit of wire inwards with the back of your nail so that it does not stick out. Doing this not only gives a finished look, it also protects the wire from snagging in hair or clothes or poking into skin.

~Sore hands
Richa
No comments:
Post a Comment